Why Backup or Clone Raspberry Pi SD Card?
Cloning your Raspberry Pi SD card is one of the easiest ways to protect your projects and avoid losing important data. Whether you are experimenting with new projects or running a stable setup, having a backup ensures that you can quickly recover your system in case of corruption, accidental deletion, or hardware failure. This guide explains how to clone your SD card using Win32DiskImager on a Windows computer and Raspberry Pi SD Card Copier on a Raspberry Pi.
Cloning your Raspberry Pi SD card offers several important benefits:
Backup Your Projects: If your SD card becomes corrupted or damaged, a clone allows you to restore your system quickly without losing any work.
Duplicate Systems: You can set up multiple Raspberry Pis with the same configuration by cloning a single SD card. This is useful for classrooms, labs, or projects requiring several identical devices.
Safe Experimentation: Before trying new software or settings, cloning your SD card ensures you have a safe copy to revert to in case something goes wrong.
Save Time: Restoring a cloned SD card is much faster than reinstalling the operating system and software from scratch.
Cloning is a simple precaution that can save hours of work and prevent frustration.
What You Will Need
Before you start, make sure you have the following:
A Windows computer (for Win32DiskImager)
An SD card reader
Your original Raspberry Pi SD card
A new SD card of equal or larger capacity
Win32DiskImager installed on your computer
Raspberry Pi SD Card Copier (if using Raspberry Pi OS)
Cloning Raspberry Pi SD Card
Video Instructions
Win32 Disk Imager
Insert the Original SD Card: Connect your Raspberry Pi SD card to your computer using the SD card reader.
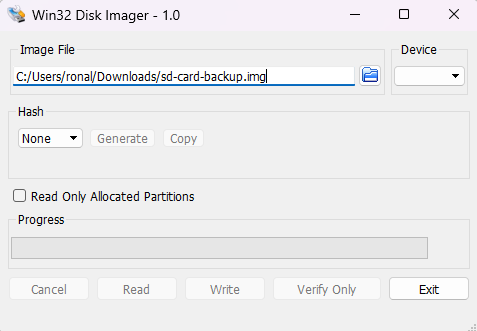
Open Win32DiskImager: Launch the program. If you do not have it, download it from the official website.
Select an Image File Location: Click the folder icon to choose where to save the backup image. Desktop or Documents works best.
Select the SD Card Device: Ensure the correct SD card is selected in the device dropdown menu.
Create the Image: Click Read to create a backup image of your SD card. This may take a few minutes depending on its size.
Insert the New SD Card: Remove the original SD card and insert the new SD card.
Write the Image to the New SD Card: Select the image file you created and click Write. The new SD card is now an exact clone.
Test the New SD Card: Safely eject the SD card and insert it into your Raspberry Pi to check that it works properly.
Raspberry Pi SD Card Copier
If you are using a Raspberry Pi running Raspberry Pi OS:
Insert the New SD Card: Connect the new SD card to your Raspberry Pi.
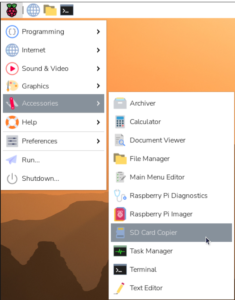
Open SD Card Copier: Go to the Accessories menu and open the tool.
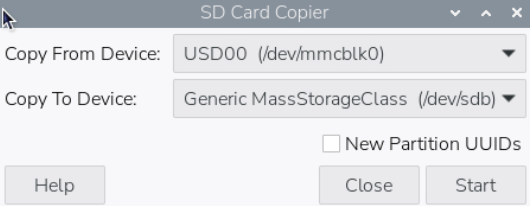
Select Source and Destination: Choose the original SD card as the source and the new SD card as the destination.
Start Cloning: Click Start to copy the contents. This may take several minutes depending on your SD card size.
Finish and Test: After the process completes, the new SD card will be a full clone. Insert it into your Raspberry Pi to verify everything works.
How to install SD Card Copier on a non RaspberryOS RPi5 system, like a Ubuntu or other Debian OS for RPi (I use Mx Linux 23.6 KDE)?
MX Live USB Maker: Located in your MX Tools menu. While normally used for bootable ISOs, its “Clone” functions can safely duplicate block storage devices.
KDE Partition Manager: Since you are using the KDE edition, you can use this interface to copy partitions directly from your active drive to a target USB/SD card reader, matching piclone’s exact method.
If those are still not cutting it, you can try CloneZilla. Here is a google search with some useful info: https://www.google.com/search?q=how+to+image+debian+desktop+clonezilla&sca_esv=dc37c2f0b8a15054&sxsrf=ANbL-n44IhOTRy5B4oRrQ4h54DFLeKaTnA%3A1778966459021&ei=u98Iauh9wqyFsg-5gp3ABg&biw=1767&bih=884&ved=0ahUKEwiox-2-3r6UAxVCVkEAHTlBB2gQ4dUDCBI&uact=5&oq=how+to+image+debian+desktop+clonezilla&gs_lp=Egxnd3Mtd2l6LXNlcnAiJmhvdyB0byBpbWFnZSBkZWJpYW4gZGVza3RvcCBjbG9uZXppbGxhMgUQIRigATIFECEYnwUyBRAhGJ8FSPYgUPcBWPYfcAB4ApABAJgBkAGgAYMIqgEDOC4zuAEDyAEA-AEBmAIMoAKmCMICBBAAGEfCAgcQIRgKGKABmAMA4gMFEgExIECIBgGQBgiSBwM5LjOgB-c5sgcDOC4zuAefCMIHBTIuOS4xyAcUgAgB&sclient=gws-wiz-serp